Quick Access
Materials used
o Dark blue, stretchable cotton fabric
o White cotton fabric
o Red cotton fabric
o Black cotton fabric/synthetic leather o Stretch velvet
o White faux fur
o Dark brown natural/synthetic leather cord
o Wooden beads, donut-shaped, with a diameter of 20mm
o White hemispherical bead with a diameter of ~13mm
o Wooden beads in dark brown/black, macaron-type
o Fibran sheet, 8cm thickness
o Hot silicone
o Hot silicone gun
o Acrylic gesso primer
o Acrylic paint – white, red, black, gold (anthracite, asphalt lacquer)
o Thermoplastic beads
o 2 pairs of 3D glasses with film o Large safety pins
o Earring findings
o Contact adhesive
o Wooden broomstick
o EVA foam
o Worbla (optional)
o Wood varnish (in case you change the color of the wooden stick)
o Heat gun
o Fine sandpaper
o Sewing machine
o Embroidery frame
o Embroidery floss
o Scissors
o Grater
o Cap with a visor
o Toothpick
o Craft knife
o Plumbing mechanism
Wig

For the base, I used a chestnut short wig with bangs. It was longer than desired, so I had to style it to fit the character.
To achieve this, I needed a comb, thinning scissors, hair spray, hairpins, and a wig stand. Since San’s hair is quite short, I was careful not to cut it too much, as there is a risk of the wig net becoming too visible.
Initially, I reduced the overall length of the hair, then started thinning the upper layers, but very little. This gives a more natural look to the wig.
To keep the bangs in two different directions, I first divided them in the center and then attached each part with hairpins towards the remaining hair. I sprayed with hairspray 3-4 times to set and maintain the style.
After the hairspray dried, I removed the hairpins and sprayed again.
Makeup
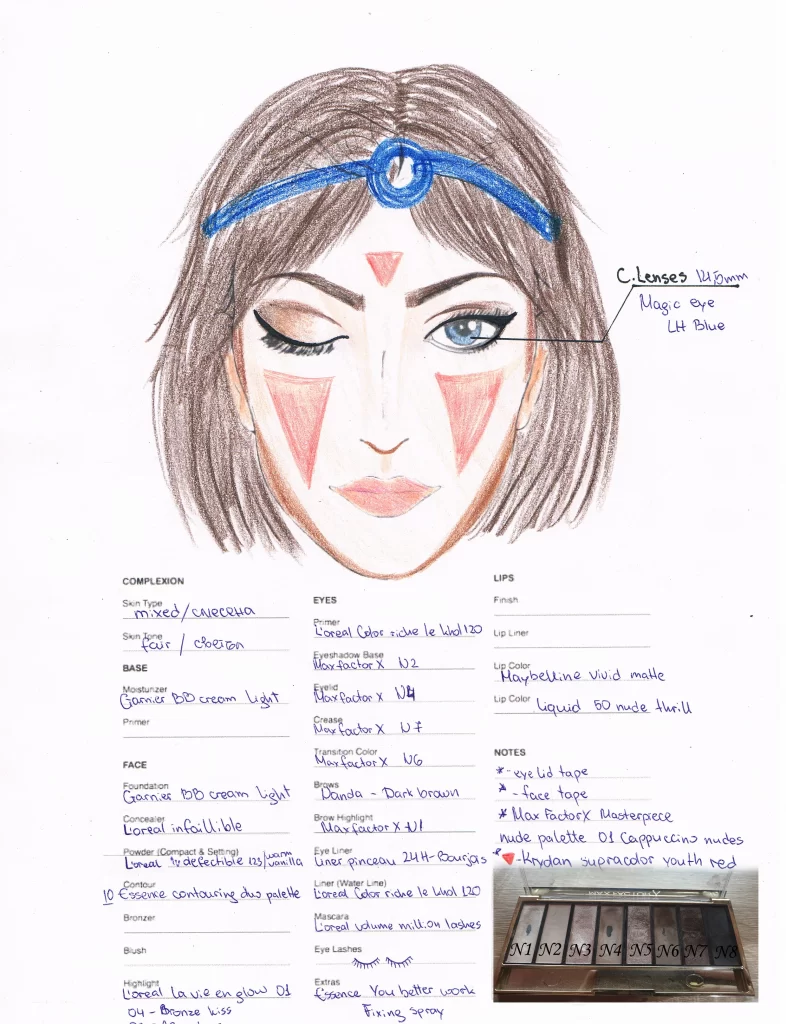
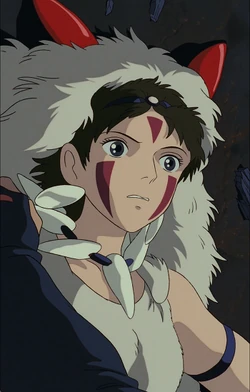
I adhered to the natural brown palette for the makeup. I wanted the look to appear completely natural, so I avoided black and very dark eyeshadow tones.
I used tape to enlarge the eyelid to get closer to the large anime eye. I applied the tape from the innermost part of the eye and positioned it towards the outermost. To emphasize the eye, I used dark brown under the lower lashes. For the teardrop channel, I used a white pencil, and for the eyeliner, I used liquid liner with a thin brush.
I intentionally did not use heavy false eyelashes but stuck to more natural ones. For all materials and brands, refer to the San makeup template file.
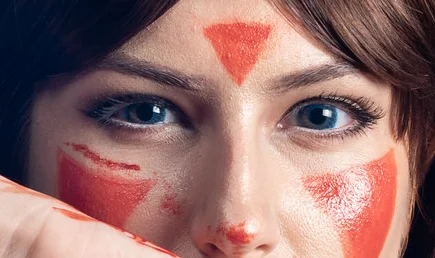
For the red triangles, I used oil-based makeup from Kryolan, which costs around 9 BGN for a small package. Contouring is crucial – apply darker shades of brown under the chin and blend towards the ears. This will give you more pronounced cheekbones or visually correct their shape. Finally, seal the finished makeup with makeup fixative.
I had a tough time choosing contact lenses for the character, as in the film, San’s eyes are rarely seen. Even until the last moment, I thought she had brown eyes. According to Wikipedia, however, she has blue eyes, and I stuck to that information.
The lenses I chose are blue with a diameter of 14.5mm. I think a smaller diameter than this would not resemble the anime style as much, and anything larger would be too unnatural.
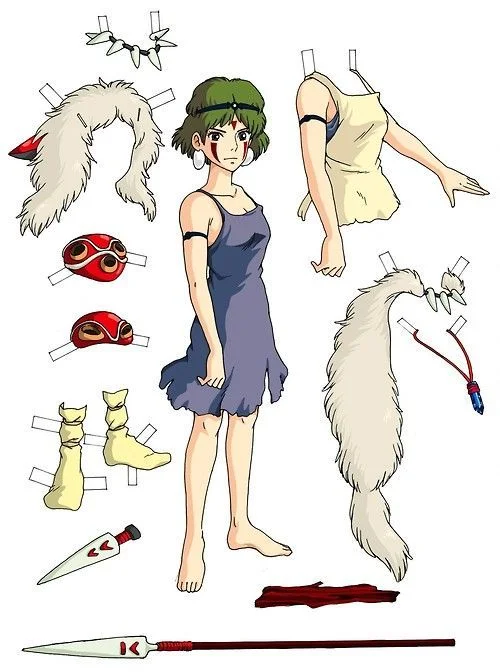
Accessories
Accessories include:
- 2 pieces of wristbands
- 1 headband
- 2 earrings
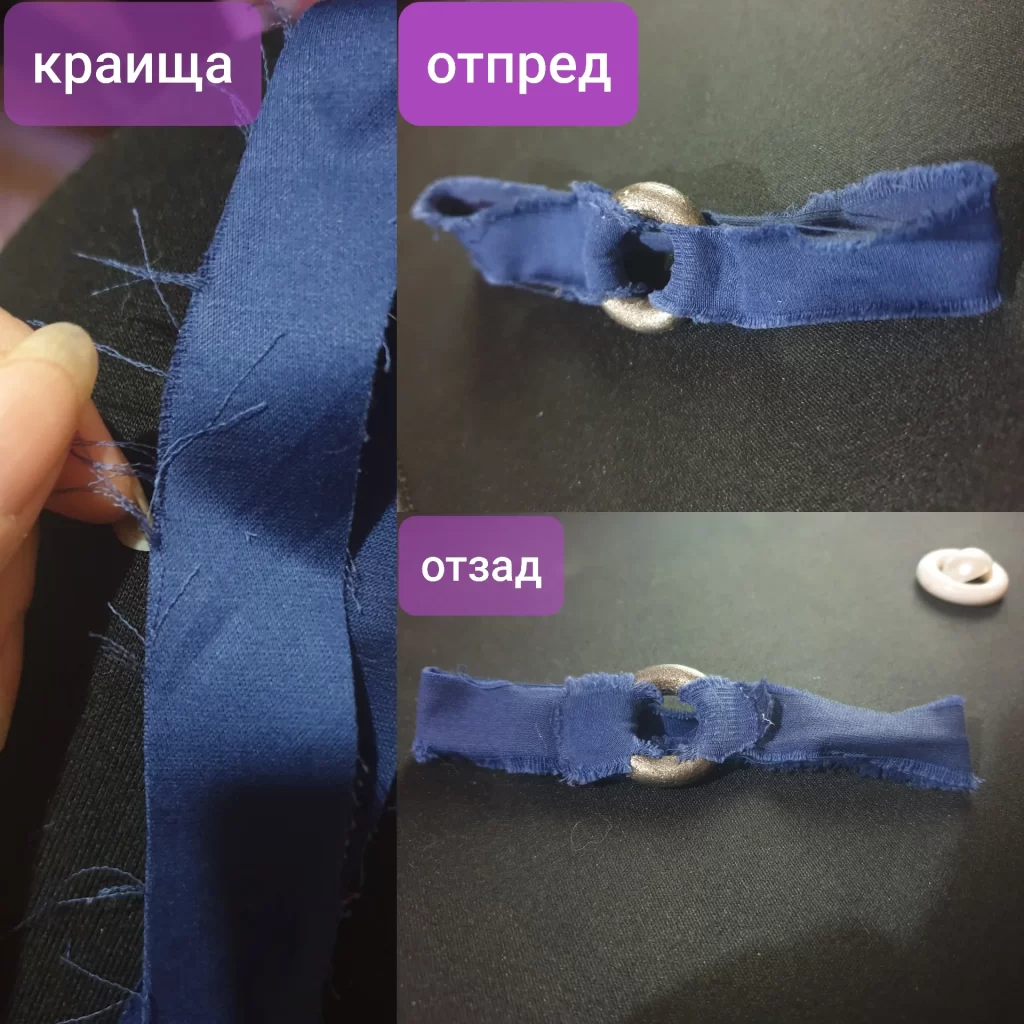
For the creation of the wristbands, I used the same fabric as for the dress. It is essential to check the direction of elasticity. To make them, measure the circumference of your biceps and leave about 6 cm extra. This will be needed during sewing and attaching the details. Then cut the bands in half. For decorations, I used wooden beads of the donut type. Since I couldn’t find the specific color, I had to paint them. I used the 3138 anthracite color from Cadence. I attached the bands to the donuts by simply passing them through the circle and glued them to the back with contact adhesive. At the far end, I sewed with a straight stitch on the sewing machine.
I made the headband the same way as the wristbands, but the difference is in the decoration in the center, and the ends of the bands are pointed in a triangular shape.
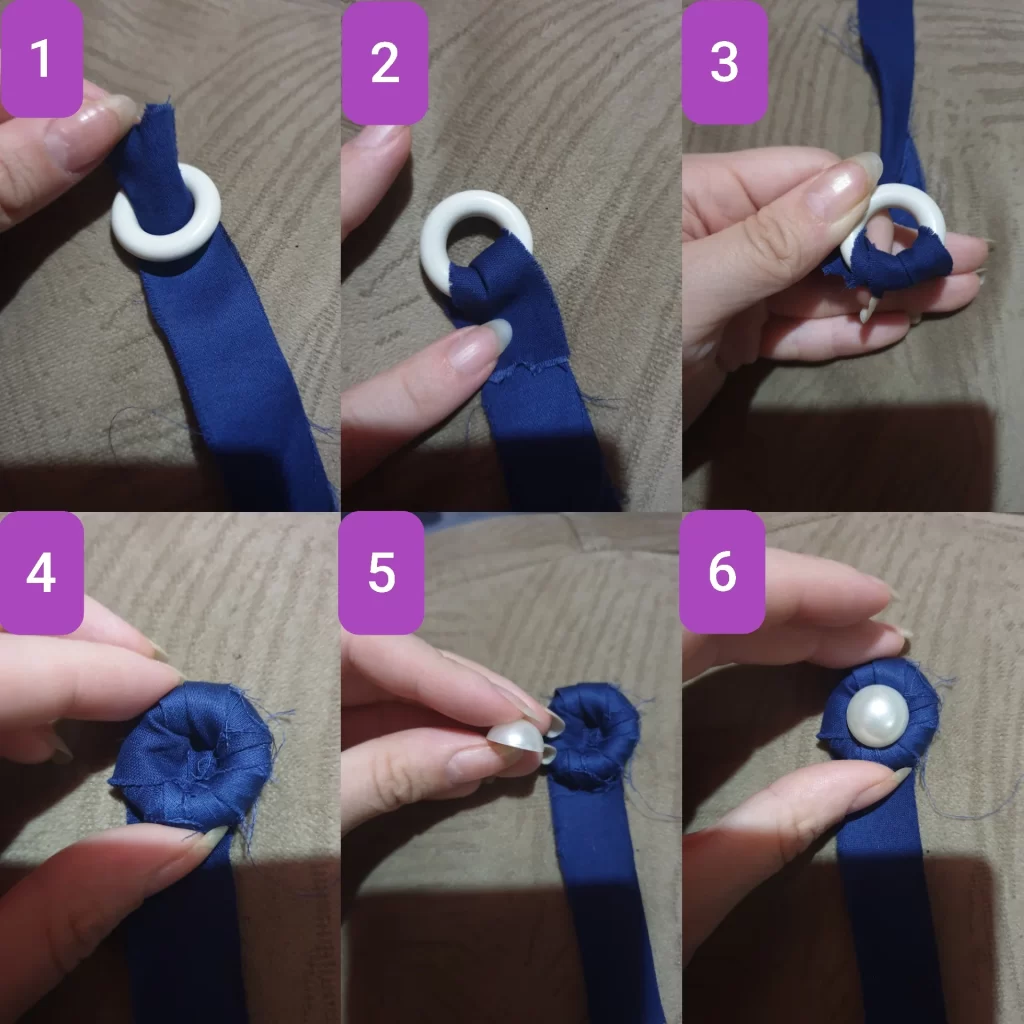
The donut is different from those on the wrists, and instead of painting it, I wrapped it in the same fabric as the bands.
After completely securing the band around the donut, I glued a hemispherical pearly white bead with hot silicone.
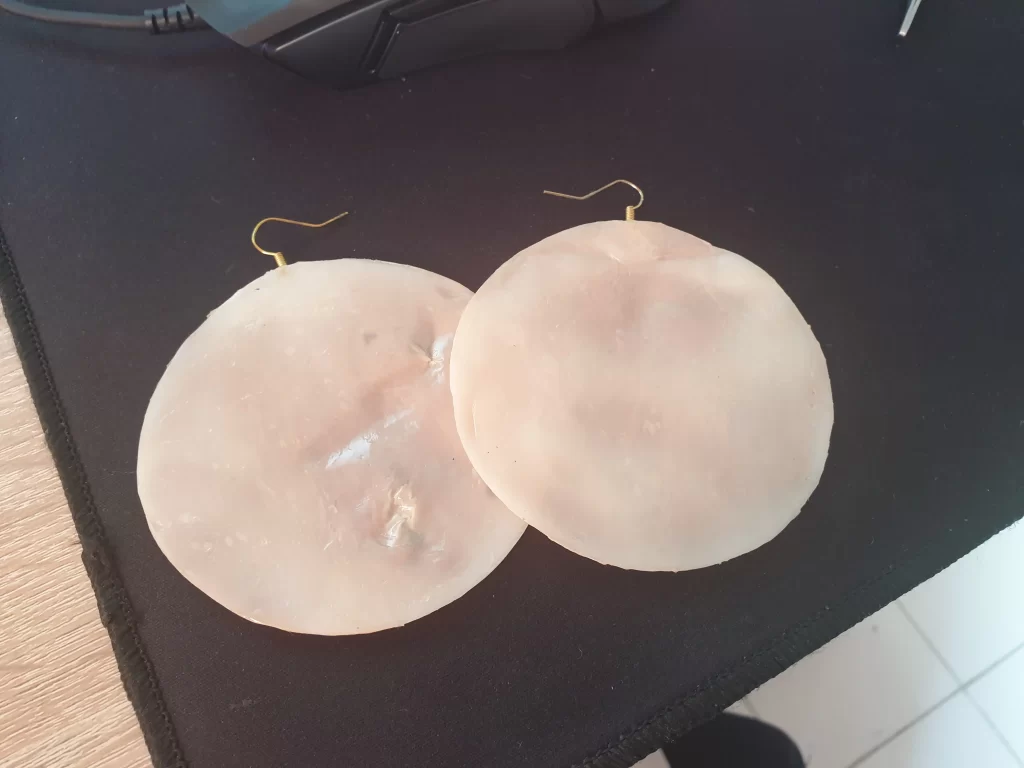
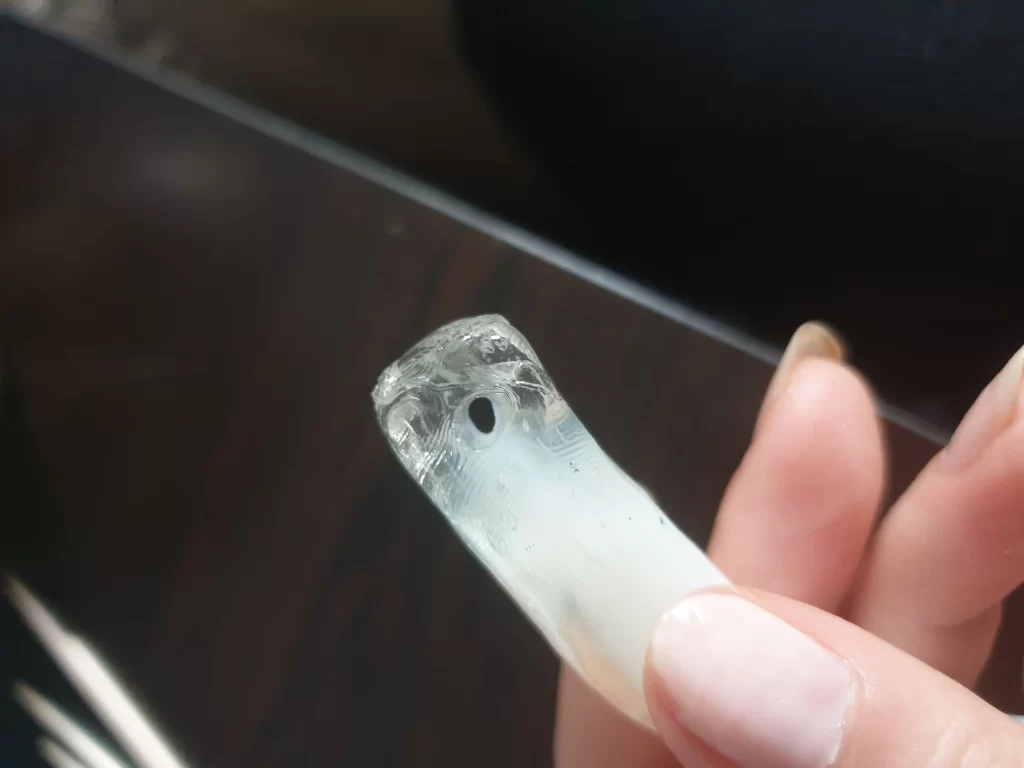
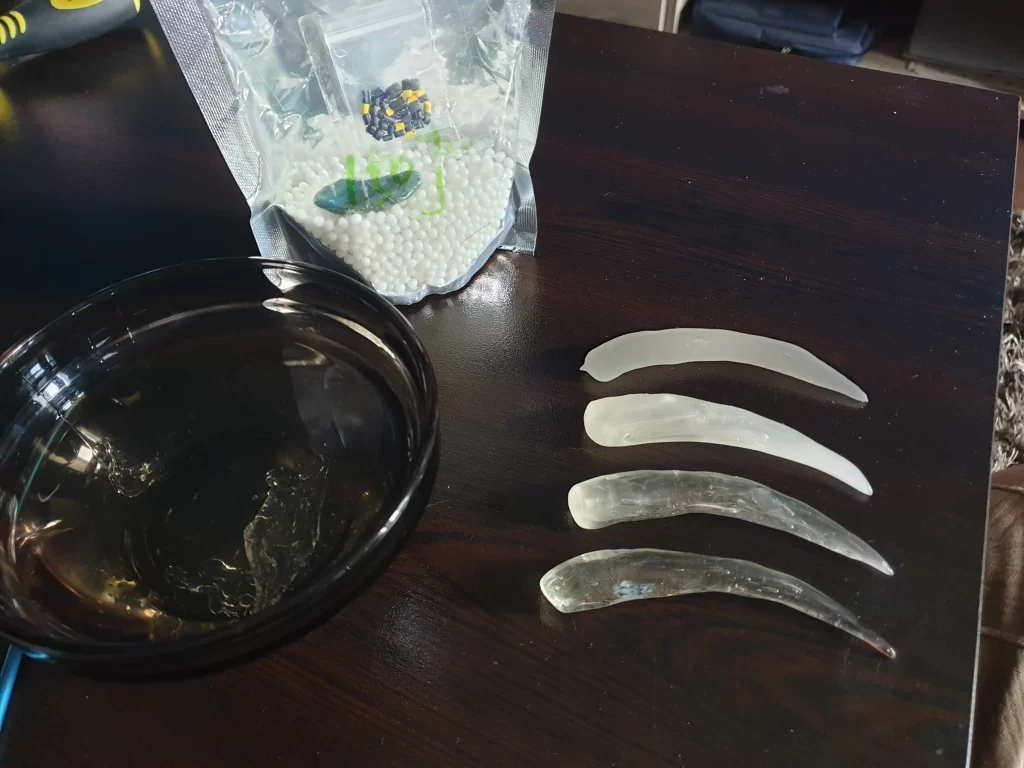
For the earrings, I used thermoplastic beads that can be molded when heated. Here’s how to work with them: Heat a container of water in the microwave or on the stove. Place the beads in it. The water should be very hot to melt them successfully. They are ready to work-with when they become completely transparent.
Be careful not to burn yourself with the water! Use a tool to remove the beads; do not stir in the hot water with your hand! Take a portion of the melted substance and spread it on a non-stick surface. I worked on the table and spread the plastic on a nylon bag. I used an old brush to spread it evenly. For the shape and size, I used a Pringles chip lid, which I pressed on top of the spread mixture.
Then, I made a small hole from the top of the circle through which I would later pass the earring findings. After it cooled, I cut along the marked angles with scissors. Since the material is white, there is no need for additional painting.
I wanted to create a pearly effect, so I applied nail polish on top several times.
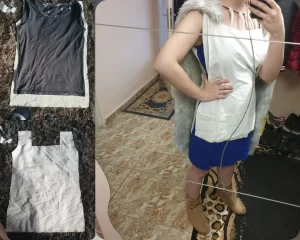
Dress and apron
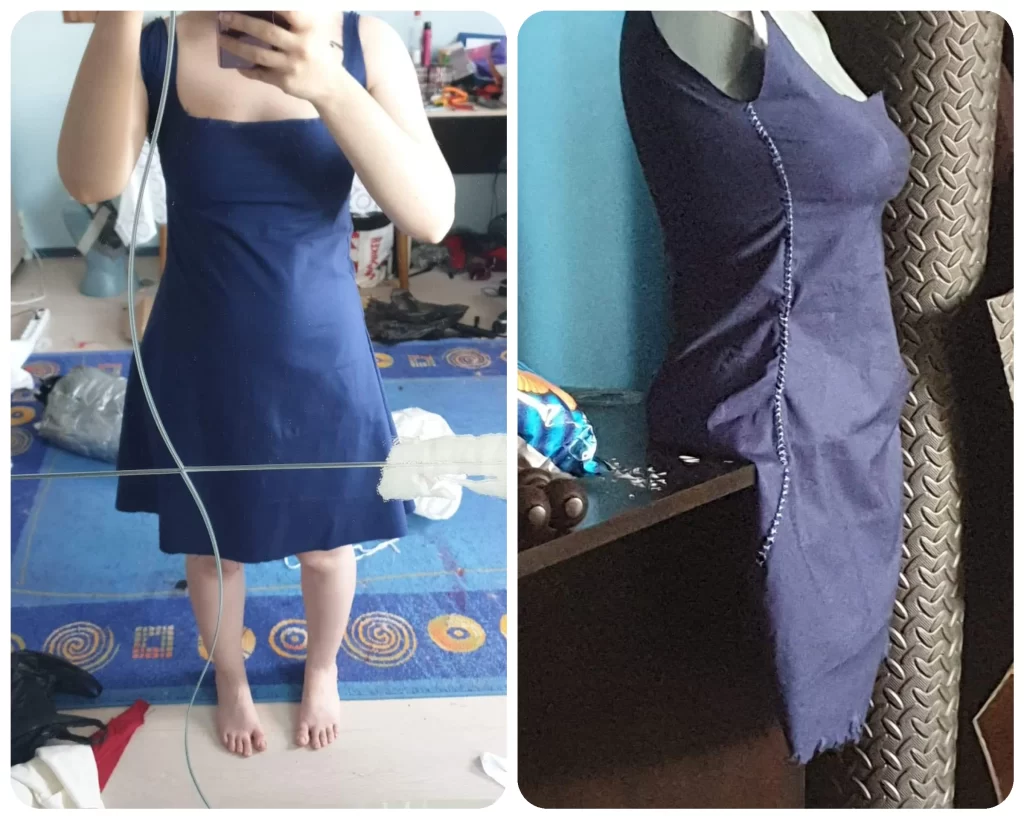
To create a pattern for the dress, I used an everyday fitted dress that I owned, which had an approximate length. I traced along the edges, leaving a 1.5 cm allowance. Do not trace the sleeves as they will not be needed. Shape the dress like a bell after the waist to give it a more relaxed look. To ensure it fits, it’s best to measure yourself (bust, waist, hips) and compare it to the drawn image of the fabric.
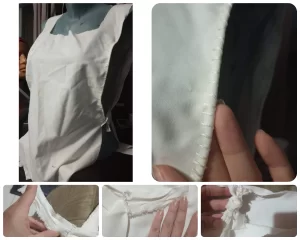
The fabric I used is ink-blue cotton with elastane. It stretches in two directions. The dress has 1 front and 1 back part, which I sewed with a straight stitch on the sewing machine. To recreate the era and location, I decided to make all edges without hem/overlock.
I also added details along the existing seam of the dress. To make them, I used an embroidery frame and embroidery floss. I secured the fabric with the frame and started embroidering, making sure to create straight stitches along the main seam.
To achieve a torn effect at the base of the dress, I initially cut with scissors and then used a kitchen grater – the section with stars – to further fray the threads of the fabric. Be careful not to injure yourself when working with the grater – work slowly and safely!
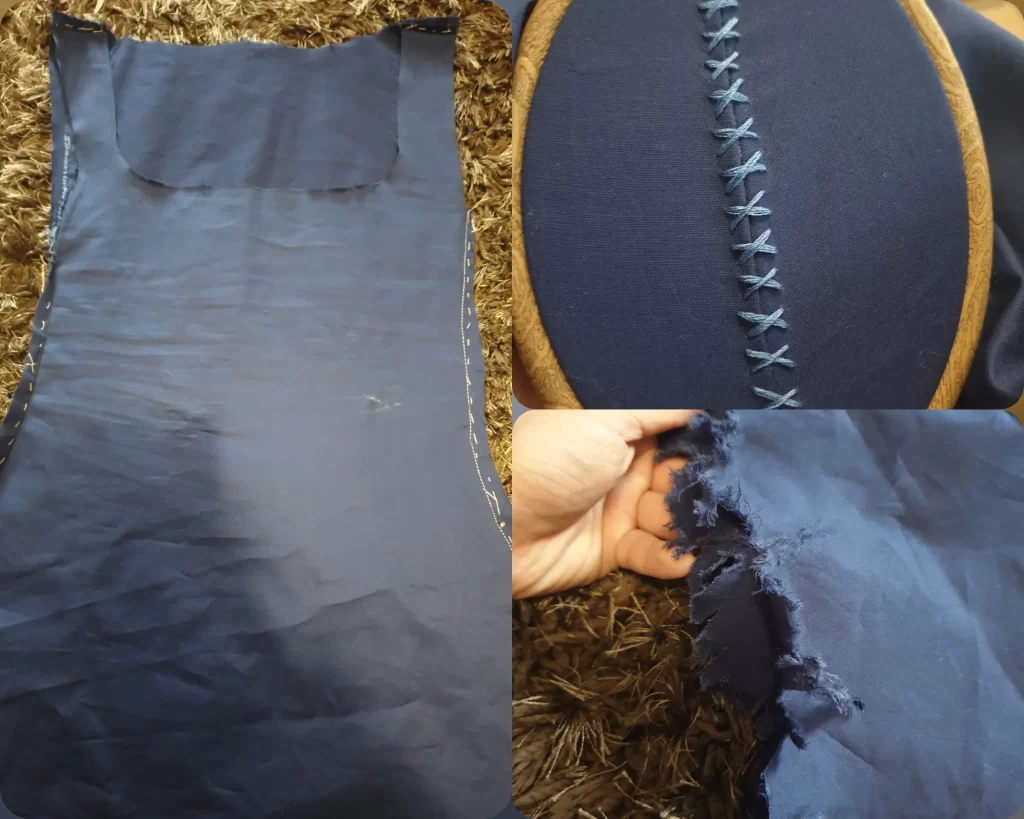
I made the apron by taking a pattern from my T-shirt. I measured to just below the waist and cut where needed.
From the remaining fabric, I extracted two strips, which I cut in half and sewed onto the apron so that they fall across the hips. Once again, I added details with embroidery, but this is not a mandatory step. The fabric used is cotton.
You can add or edit as much as you like.
I, perdonally, strive to get as close as possible to the original design, and left it at this step.
Shoes
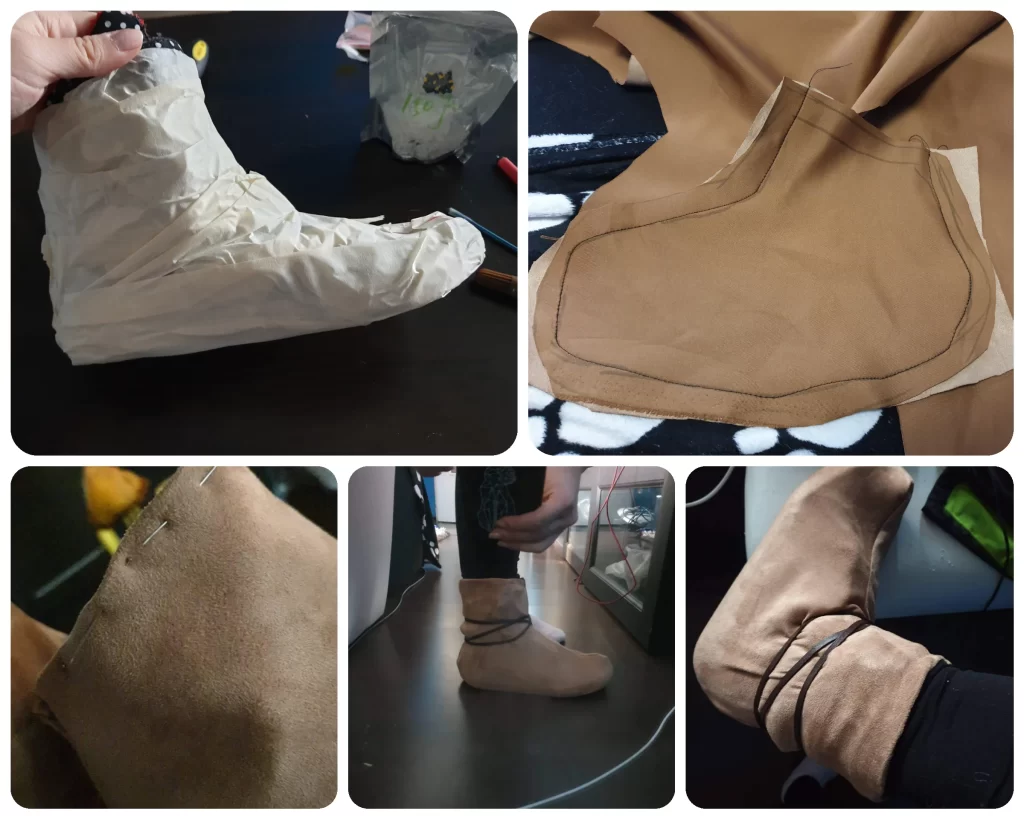
For making the shoes, I used stretch velvet. I liked my sneakers, which I thought would be comfortable for wearing the costume all day.
I turned the fabric inside out, placed the shoes on top, and traced around them. I made sure to leave about 1 cm more than necessary to have room for sewing. After cutting the first half, I created a mirrored half of the cut part and matched the two pieces.
I folded the top edge and matched again. I sewed with a straight stitch on the machine, starting from the base and finishing with a zigzag at the top.
I recommend doing the opposite – sewing from the top to the base, as it will be easier for you.
Then, I added leather laces, which I wrapped around the ankle and simply tied them.
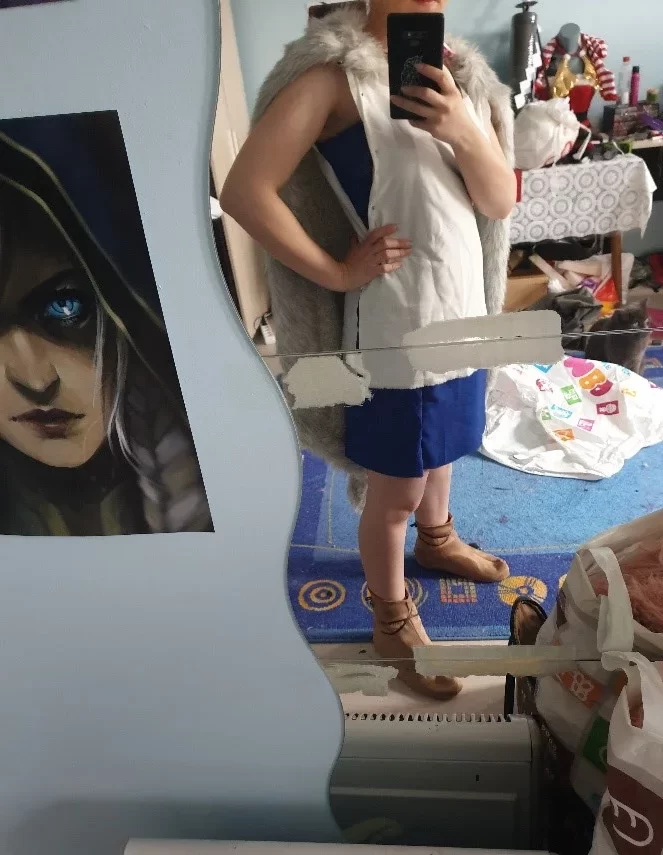
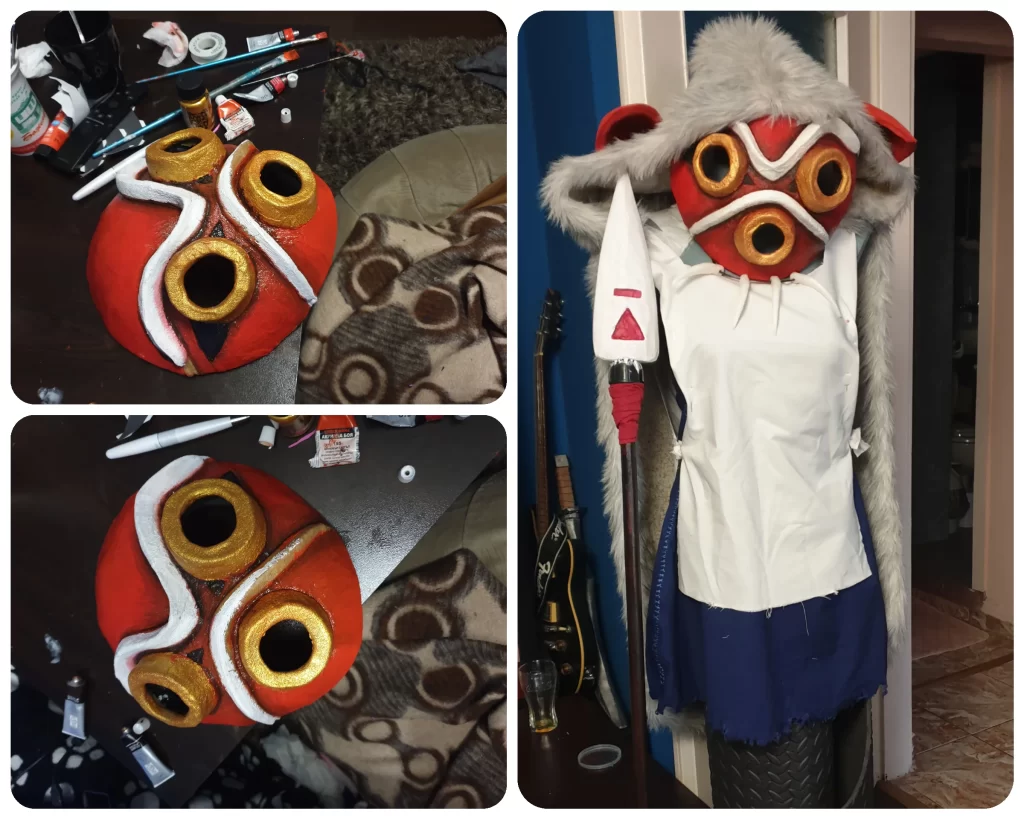
Cape and necklace
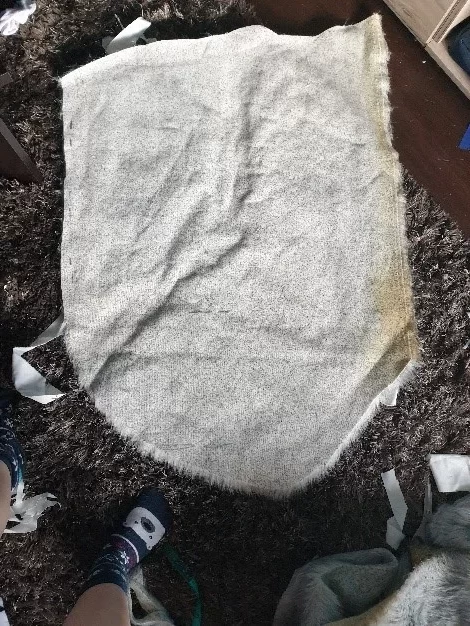
I started the cape by first measuring my shoulders. The upper edge is the narrowest part of the garment. The shape is a rectangle/square, gradually extending towards the end and finishing with a triangular base. I hemmed it by attaching the edges from the inside with hot silicone.
I made the tail with the remaining piece of the same faux fur, attaching it directly onto the cape with silicone. The entire cape is secured with sturdy, large safety pins for the blue base.
The hood has a standard pattern for a hood. I made two mirrored halves, which I sewed at the center. Then, I hand-sewed it to the upper part of the cape. I recommend using industrial threads as they are much stronger and more durable than standard threads.
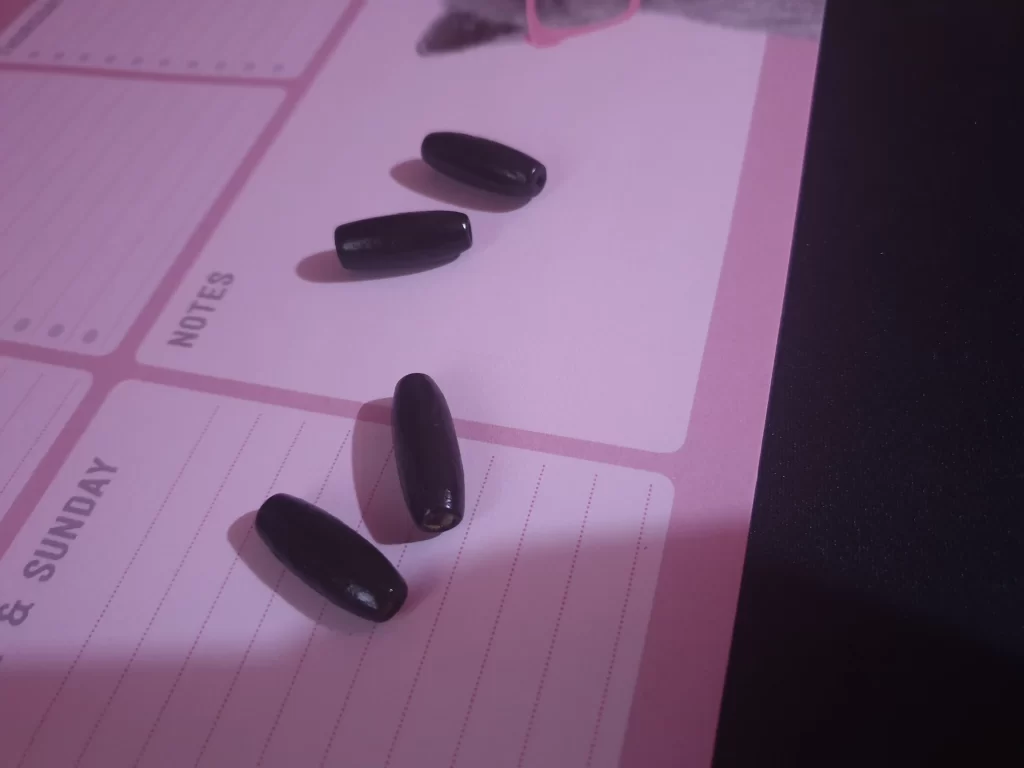
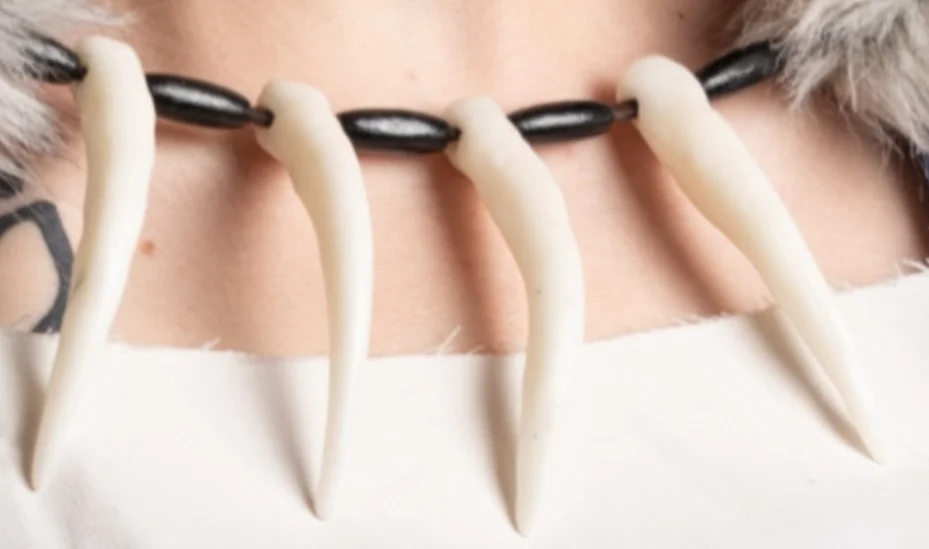
For the necklace, I used a natural leather cord. I threaded black wooden beads onto it, alternating them with wolf teeth made from the same thermoplastic beads used for the earrings. Before the mixture solidifies, don’t forget to make a hole through which the cord can pass.
I passed the necklace between the outermost stitches of the hood and the cape. This tightens the cape and makes it sit better. Even if the safety pin comes undone, the necklace will hold the cape on your shoulders.
Mask and ears
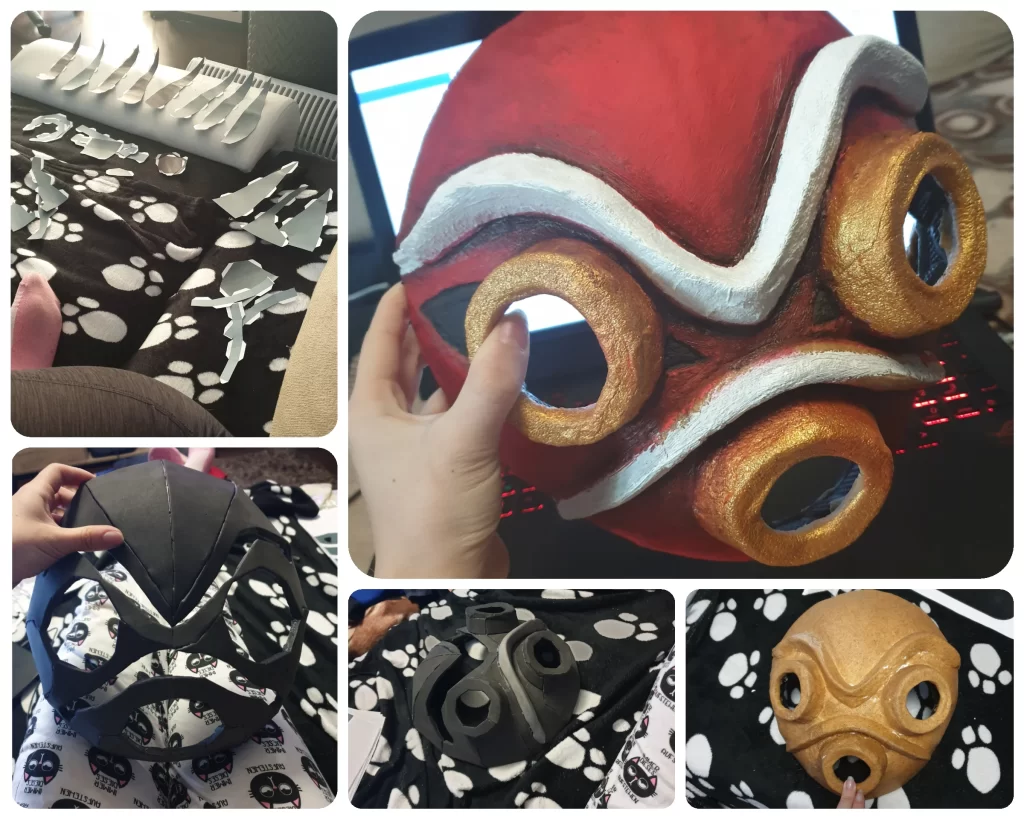
The model for the mask was found online. Search in Google for “mononoke hime mask pepakura”. What you are looking for is on DeviantArt, created by Gankutsu-o-taku. Initially, I had some difficulties; I couldn’t clearly understand which part attaches to which. Therefore, I recommend downloading the pepakura program. It’s free, and you will easily navigate and understand where each part fits.
I printed the entire mask, cut all the parts, and transferred them to a piece of EVA foam. Then, I started gluing the parts according to the diagram with contact glue. For the lines on the mask, I used air-drying modeling clay. It shapes easily and needs to be worked with quickly, as it dries within a few minutes of opening the package.
Since the costume is intended for a dynamic scene, I chose to reinforce the mask with Worbla. Of course, this step is not mandatory. The mask will be fine with just EVA; it will even be lighter, but you will need to sand it well at the corners to hide the glued parts.
If you still decide to make it with a layer of Worbla: Before placing the Worbla sheet, I sanded with a Dremel all the unevenness from the base. This includes the parts made of modeling clay. Then, I heated a larger sheet of Worbla and applied it while it was warm onto the mask. I waited for it to cool down and heated it again with a hot air gun so that it adheres well to the mask and does not leave air bubbles or unevenness underneath. After that, I primed it with acrylic primer (gesso). For paint, I chose oil paints from Daler Rowney. Honestly, I regretted my choice because they dry very, very slowly (it took 4 days to dry on the terrace) and care must be taken not to leave it in direct sunlight for too long, as the color begins to change. I prefer the alternative with acrylic paint, but there was no way to change it at this stage.
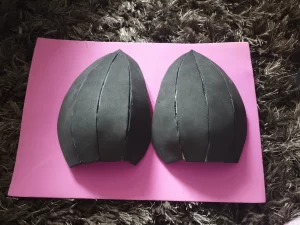
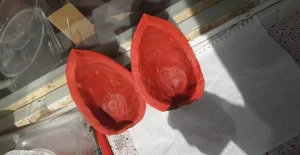
I made the ears from EVA foam, primed them, and again used a layer of Worbla and oil paints. For the inner side, I used a darker red compared to the outer side.
To attach them to the cape, I used a regular cap, the visor of which I cut out.
Then, I glued the mask from the inside to the cap with a thick layer of hot silicone. After that, I made 2 holes in the hood of the cape for the ears and glued the cap to the hood of the cape.
After securing the hood, I also glued the ears by pushing them well into the holes.
On the round openings on the mask, I placed 3D glasses laminate, gluing them to the mask with hot silicone from the inside.
Weapons
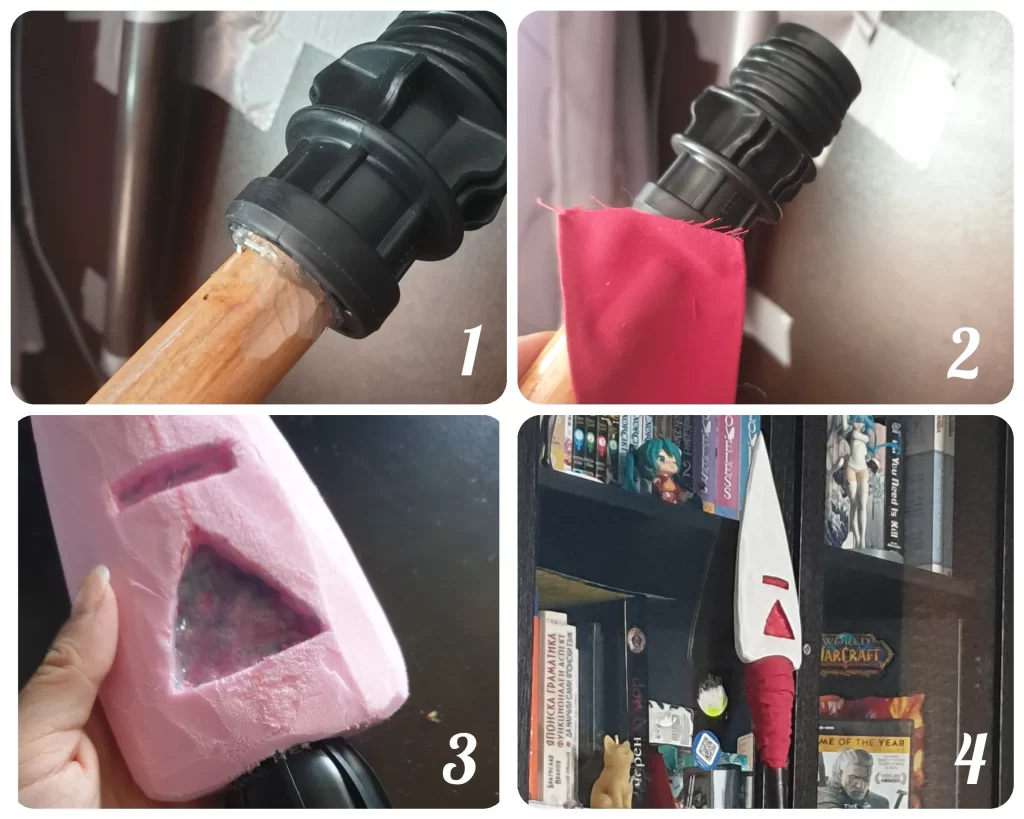
For the spear, I used a wooden broomstick, a plumbing mechanism, and an 8cm Fibran sheet. Since the wooden stick was light in color, I had to paint it. I used acrylic paint from Maestro Pan – 315 Asphalt Lacquer. Then, I sealed it with wood lacquer. I attached the plumbing mechanism to the stick by gluing them together with hot silicone. I wrapped a piece of fabric around the base so as not to interfere with the mechanism.
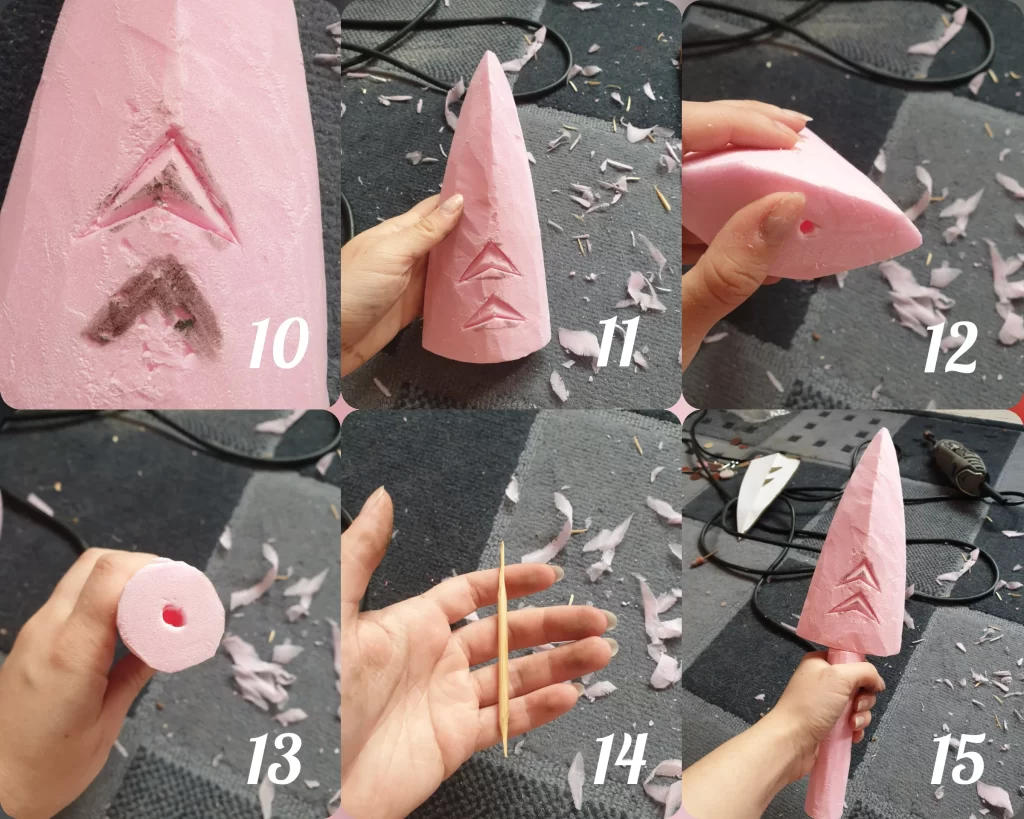
I started the blade with a paper template, which I transferred to the Fibran sheet. Then, I carefully cut along the outlines with a craft knife. To give it the appearance of a blade, I began slicing each side and reducing the Fibran with the craft knife. After achieving the desired shape, I sanded it with fine sandpaper. I shaped the details by cutting diagonal holes with the craft knife. Then, I used the heated tip of the silicone gun to smooth the inner part of the details.
For attaching the second part of the mechanism, I again used the tip of the silicone gun to make a hole in the Fibran and insert the plastic part into it. Then, I carefully glued it with hot silicone, but you need to be careful about the temperature! It should not be too liquid and hot, as it may melt the Fibran.
Once the two parts were glued, I covered the remaining part of the mechanism with the same fabric used for the lower part.
When the base is ready, it’s time for priming. I used white gesso, and after it dried, I sanded with fine sandpaper all the irregularities created by the brush strokes. Then, I painted it with white acrylic paint and sanded again with an even finer sandpaper. After the white fully dried, I painted the red details.
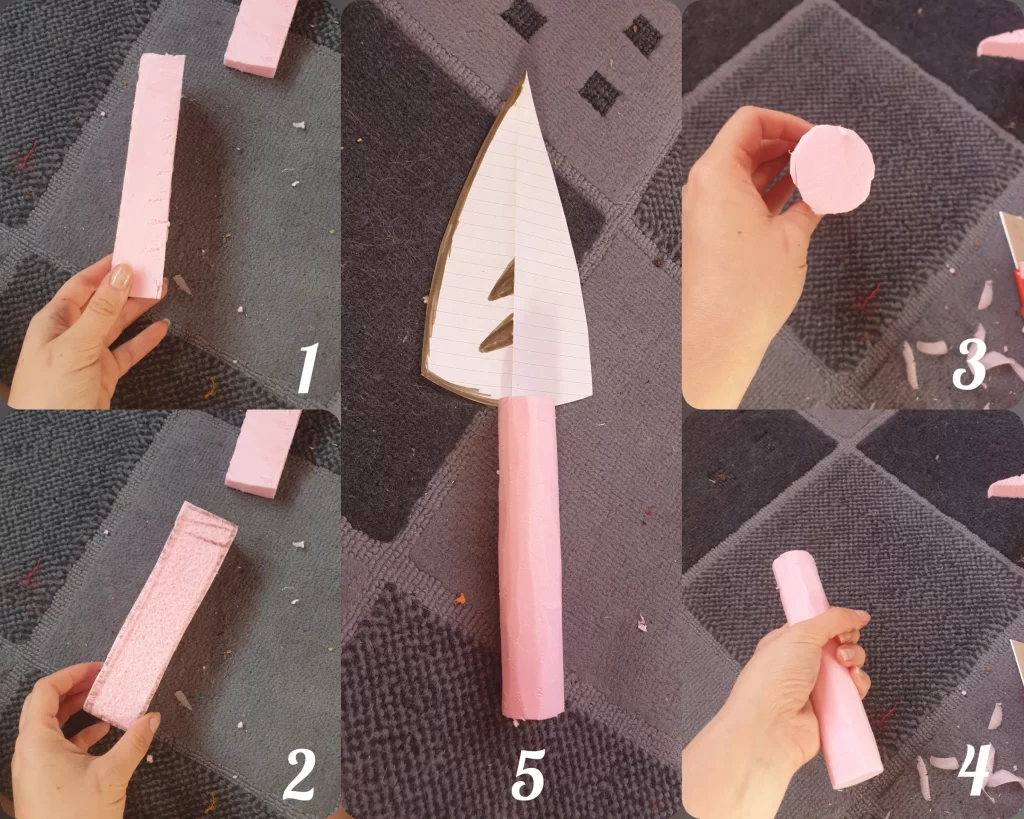
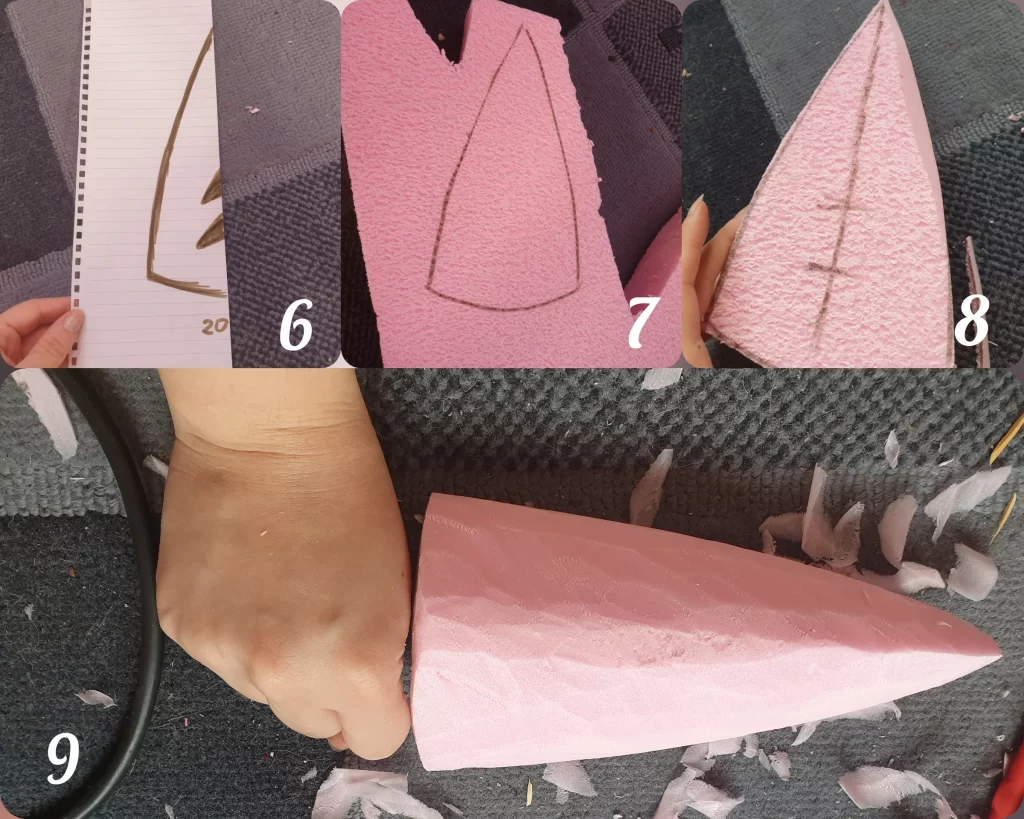
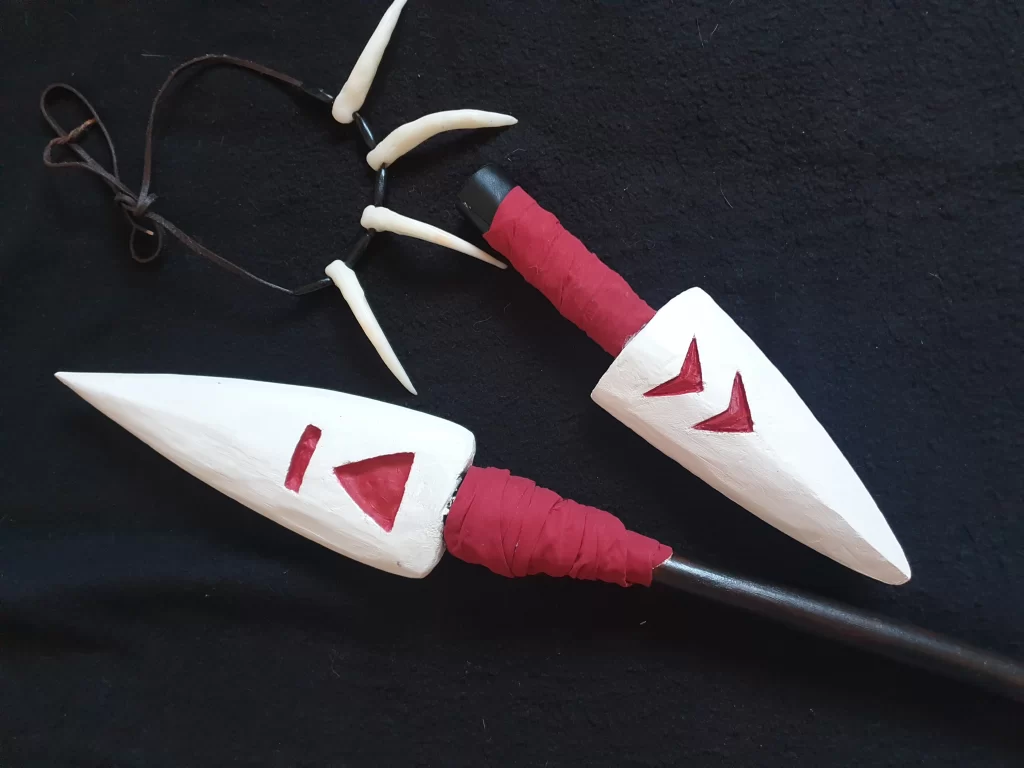
I made the scabbard entirely from Fibran. I started with a paper template, which I transferred onto the Fibran. Then, I cut out all the parts with a craft knife and began slicing until I obtained the desired shape.
After shaping the handle and the blade, I sanded with fine sandpaper and primed with 2 layers of gesso (only for the blade). When the gesso dried, I sanded again and painted first with white and then with red acrylic paint.
For the handle, I used the same fabric that I put on the spear. I cut a long strip, wrapped it around, and glued it onto the Fibran. Leave about 3cm from the end to repeat the same process, but with black fabric. I used black synthetic leather for the finish.
To join the two parts, I used a toothpick. I made small holes in the center of the blade and the handle, then applied hot silicone around and in the holes. While it was still hot, I threaded the toothpick and connected the two parts.